
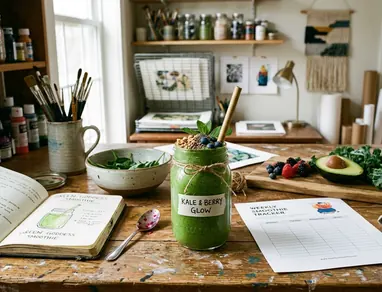
Here's a kitchen trick that feels like cheating: the threaded collar on most standard blender blades screws right onto a regular-mouth Ball mason jar. Same threads, same fit, no special attachment required. You blend, you drink, you cap it, you walk away. The giant blender pitcher stays in the cupboard, unbothered and unwashed.
Here's how it works, where it shines, and the one safety rule you absolutely cannot ignore.
Quick Takeaways: The Mason Jar Blender Trick
If you only read one section, make it this one.
- Standard blender blade assemblies thread directly onto regular-mouth Ball mason jars. The match is mechanical, not magic.
- You blend, drink, and store in a single container. That collapses cleanup down to one jar and one blade.
- The hack handles single-serve smoothies, faux ice cream, and small-batch savory purees with ease.
For a single serving, reach for a jar in the 12- to 16-ounce range rather than a quart. The smaller chamber keeps ingredients hugging the blades instead of floating uselessly above them. Fill below the shoulder so inverted contents have room to drop into the blade zone, and run your first blend in short 10- to 20-second bursts.
Summary: One jar replaces the pitcher, the cup, and the storage container. Less to wash, less to wreck, more time for the fun stuff.
How the Standard Blender Blade Fits a Mason Jar
The whole trick rests on a quiet coincidence of manufacturing: standard blender bases share the exact same threading as regular-mouth mason jars. Nobody designed it that way on purpose. The threads just happen to agree.
Credit where it's due. This technical tip was originally shared by Delilah Snell back in February 2012, and it has quietly outlived a decade of fancier gadgets.
The step-by-step swap
- Detach the pitcher from the motor base.
- Unscrew the blade collar from the bottom of the pitcher. The blade, the rubber gasket, and the collar come away as one little unit.
- Fill your regular-mouth jar with ingredients, staying below the shoulder.
- Seat the rubber gasket against the jar rim, set the blade plate on top, and screw the collar down onto the jar threads.
- Flip the jar, lock it onto the motor base, and blend.
The gasket is the unsung hero here. It belongs between the glass rim and the metal or plastic blade plate. Skip it, and liquid leaks straight down toward the motor base the moment you invert the jar. Hand-tighten the collar until resistance feels firm, then double-check that the gasket hasn't folded or slipped out of its groove.
When you're done, let the blade stop completely for 5 to 10 seconds before lifting the jar off the base. Patience prevents splatter.
Testing the Hack: Faux Ice Cream and Smoothies
Smoothies are the gateway drug, but the real stress test is faux ice cream. Thick, frozen, stubborn. If the hack survives that, it survives anything you'll throw at breakfast.
Phil volunteered as the test subject, mostly because he wanted dessert. The mixture proved the blade can chew through frozen ingredients without complaint, as long as you load the jar in the right order.
Layering is everything. Add liquid first so it sits nearest the blades after you flip the jar. Soft fruit or yogurt goes next. Frozen pieces ride on top. For a faux ice cream texture, start with 2 to 4 tablespoons of milk, yogurt, or other liquid for every 1 cup of frozen fruit, and only add more if the blade stalls.
Cut large frozen fruit into pieces no bigger than roughly 1 inch before loading. Then pulse 3 to 5 times for 2 to 3 seconds each before switching to a steady blend. Those pulses break up the block before it has a chance to lock above the blade.
Quick Tip: If the mixture stops circulating for more than 3 to 5 seconds, the blade is just spinning in a frozen cave. Turn it off, lift the jar, give it a shake or two, and restart with another short pulse.
The payoff lands hardest for creative entrepreneurs hustling between deadlines and parents racing the school clock. Single-serve breakfast, blended and drunk from the same jar, with nothing to wash but a blade. Our testing supports the obvious: fewer parts means fewer reasons to skip the smoothie entirely.
Beyond Breakfast: Blending Tomato Puree
Sweet smoothies are only half the story. The same jar handles savory work, and that's where small-batch cooks start grinning.
The decision point is batch size. If a recipe would leave a quart pitcher barely coated, the mason jar is the smarter container. Tomato puree is the perfect example.
Load chopped fresh tomatoes or drained canned tomatoes no higher than the jar shoulder, leaving headspace before you attach the blade. Use 10- to 15-second pulses for a chunky puree, or 20 to 40 seconds of total blending for a smoother sauce base. Dressings, marinades, and quick pan sauces follow the same logic.
When the texture's right, remove the blade assembly, wipe the rim clean, and swap in a standard flat lid and screw band within a minute or two. That quick changeover keeps splatter off your counter. Refrigerate the capped jar promptly. For home use, plan to finish fresh puree or dressing within a 1- to 3-day window for the best flavor.
Safety Limits and Jar Compatibility
This is the section that earns the hack its long life. Skip it and you'll learn the hard way.
Run these checks in the order you'll actually meet them.
- Mouth size first. Use regular-mouth jars only. Wide-mouth jars have a larger opening that simply will not match the common blender blade collar thread. A wide-mouth jar is a guaranteed mismatch, not a fixer-upper.
- Inspect the glass. Reject any jar with chips on the rim, hairline cracks, or cloudy stress marks before attaching the blade.
- Check the gasket. A missing, warped, or misseated rubber gasket turns the whole hack into a leak the moment the filled jar inverts over the motor base.
Note: Never blend hot liquids in a sealed mason jar. Hot tomato soup, boiling syrup, anything still steaming. Trapped steam builds pressure inside the sealed glass and can force liquid out or shatter the jar. Cool it first, every time.
Tighten the collar until resistance is firm, then start on the lowest setting for the first 2 to 5 seconds. Only increase speed once liquid is visibly circulating.
One honest caveat to close on: this is a household shortcut for compatible regular-mouth jars and standard home blender blade collars. It is not a universal attachment system for every blender model, and it is no substitute for pressure-rated, high-impact commercial blending containers. Mason jars are tempered for canning, not for industrial abuse. Keep it gentle, keep it cool, and the jar will keep keeping up.
Grab a 12-ounce jar, layer your fruit, and give it a whirl. Worst case, you wash one blade.


Join the Conversation
Nothing here yet. Add your opinion.
Add Your Thoughts