
Give Every Charging Cord a Recognizable Flag
A cord jacket measuring 3–4 millimeters across needs surprisingly little material to wrap around it, yet its label needs enough room for a recognizable picture and a readable name. Start with a finished flag face measuring 1.5 inches wide by 0.75 inches tall, then check it on the actual cable. Measure the flexible jacket: a USB-C connector identifies the connection, not the cable’s outside diameter.
The strongest identification system pairs black device silhouettes on white stock with bold, short names. Color can supply the confetti. Shape and lettering should do the everyday work, especially when someone reaches behind a bedside table for the headphones lead.
The project follows a straightforward sequence: measure the cords, draw distinct device icons, print a sizing sample, prepare the protective material, and attach each flag near the device end. A free vector or canvas program handles the artwork. A Wacom tablet can make sketching comfortable, though basic shape tools provide everything these small icons need.
Reserve an initial 10–15-minute session for measuring several cords and making a paper prototype. One folded sample settles the important questions before a whole sticker sheet enters the printer: does the loop fit, does the name read clearly, and does the flag crowd the plug?
Measure the Jacket, Then Build Two Matching Wings
Sort the charging pile into practical working groups: braided fast-charging leads, soft-jacket tablet leads, and barrel-plug leads for handheld gaming devices. Measure each group rather than assuming its thickness from its purpose. Compare the flexible jacket against millimeter markings on a ruler without flattening it, keeping the connector housing and molded strain relief outside the measurement.
Allow enough material for the central loop
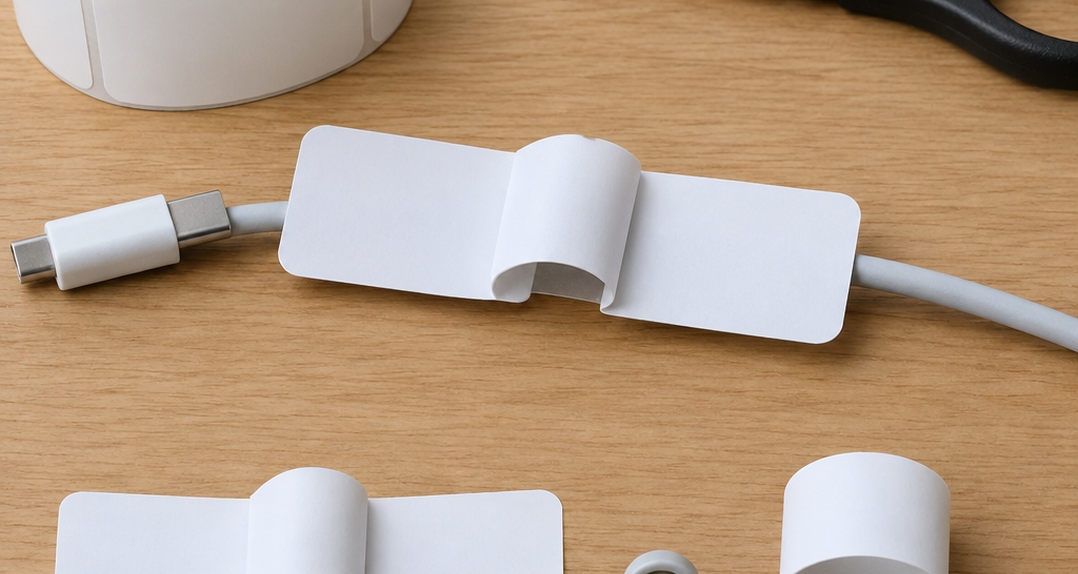
A fold-over flag has two printed wings and a central strip that loops around the wire. The wings meet adhesive-to-adhesive; the central strip accommodates the cable. Its starting allowance is the cord’s circumference, calculated as pi multiplied by diameter.
For a 3–4-millimeter jacket, that means approximately 9.4–12.6 millimeters of central material before adjustment for stock thickness. Two 1.5-inch wings plus a 0.5-inch central allowance make a flat blank 3.5 inches wide by 0.75 inches tall. Test that geometry on the thickest cord in each group before duplicating it.
Fit the blanks onto a printable page
Set the document to US Letter or A4. A two-column, twelve-row grid provides 24 blanks. With a 0.125-inch column gap and 0.0625-inch row gaps, the grid occupies 7.125 by 9.6875 inches, fitting within half-inch margins on either page size.
Keep cut lines outside the artwork and leave a white perimeter. Black-on-white labels need no full-bleed printing. Print one sample at actual size, measure it, and wrap it before filling the page with finished designs. Allow 5–10 minutes for this check; a comfortable paper loop is the useful result, not a perfectly populated screen.
Make the Tablet and Reader Look Different at a Glance
Color-coded cords offer a familiar shortcut: blue belongs to one device, pink to another. That system asks everyone to remember the code and distinguish the shades. Dim bedrooms reduce useful color information, and color-vision differences can make pastel neighbors difficult to separate. A device-shaped icon carries its meaning directly.
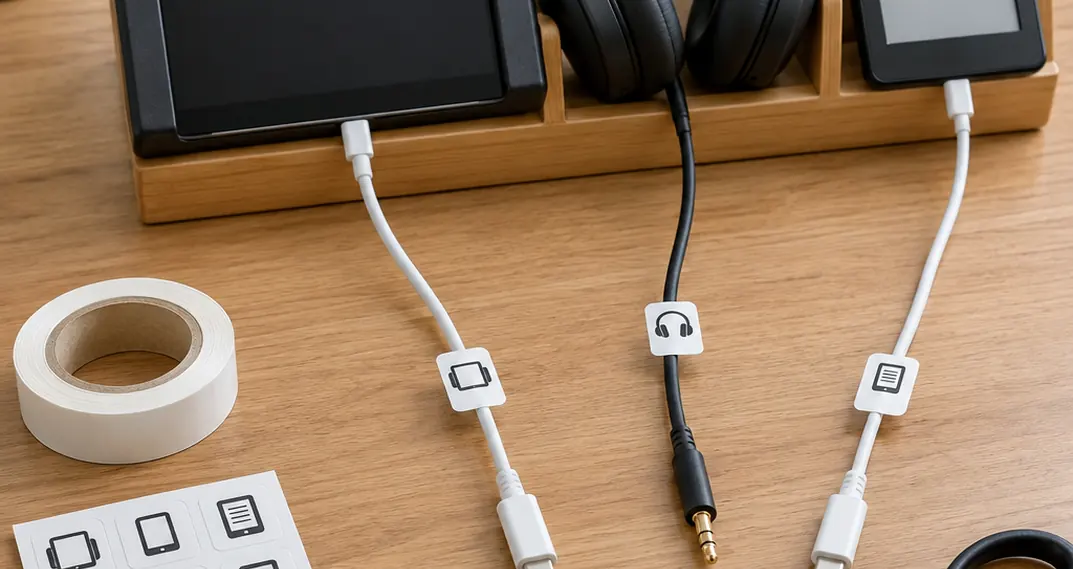
The design challenge arrives when a tablet and an e-reader shrink to half-inch pictures. Both begin as rectangles. Give each silhouette a clear identity before adding its name.
- Tablet: nest a smaller rounded rectangle inside a larger one to suggest the screen and outer body.
- Handheld console: place a central screen between two substantial side grips.
- Headphones: join two earcups with a thick, curved headband.
- E-reader: put three short horizontal page lines inside a rectangular body.
At a half-inch icon height, two or three defining features carry more clearly than miniature buttons or ports. Keep the headphone arch chunky and the console grips obvious. The finished set should remain distinguishable when the tiny interior details become harder to see.
Check the lettering on paper
Choose a bold, non-condensed sans-serif face. Start around 10–12 points for short uppercase names such as TABLET or READER, with modest positive letter spacing. Shorten an awkward name rather than squeezing its letters together.
Duplicate the artwork onto both wings, then fold a paper mock-up to check orientation. Both faces should read normally; horizontally reflected letters would read backward. Spend a 5–10-minute actual-size review comparing the icons and words. A handsome enlarged preview earns its keep only when the printed flag reads across the charging station.
Print, Seal, and Close the Flag Around the Cord
Matte printable vinyl combines a printable surface and adhesive backing in one sheet. Heavy paper covered with clear packing tape or self-adhesive laminate uses separate protective layers and creates a thicker assembly. The paper version suits a material comparison, while vinyl keeps the construction simpler.
For a paper-and-laminate sample, leave a 2–3-millimeter clear sealing border around the paper. Include that border in the template dimensions so trimming preserves the seal. For vinyl, choose stock compatible with the printer and follow its specified ink-drying or curing interval.
Check Ink Compatibility
A water-resistant vinyl face does not establish moisture-resistant printing or heat-tolerant adhesive, so check the sheet, ink, and adhesive ratings before choosing stock for the charging station.
- Print at 100% or actual size. Measure a printed blank before cutting the batch.
- Cut the sample cleanly. Keep its white perimeter intact and remove stray slivers.
- Choose a straight jacket section. Start roughly 2 inches, or 50 millimeters, below the plug housing, beyond the molded strain relief.
- Form the loop gently. Avoid a sharp crease across the cable. Align the wing corners, then press the faces together from their outer corners inward.
- Round the exposed corners. Small craft scissors can create approximately 2–3-millimeter corner radii after bonding.
Rounded corners remove sharp snag points. Check separately for adhesive squeeze-out, opening seams, and lifted edges. Keep the finished flag clear of power-strip sockets, charger ventilation openings, and the connector’s bending area. A tidy label leaves the cable free to flex where it needs to.
Let the Evening Charging Routine Judge the Tags
The useful test happens with the charging station assembled. Leave every charger brick connected and ask a younger household member and a guest to find a specific lead from arm’s length: “Find the headphones lead.” Watch whether they recognize the arch, read the word, or use both.
Repeat the request under the room’s usual evening lighting. If the reader and tablet keep trading identities, strengthen their distinguishing features before printing replacements. That small revision gives the whole household a clearer visual vocabulary.
Check movement by gently nudging the flag while supporting the cable jacket. Avoid forceful tug tests or pulling a cord to unplug a device. Inspect after 24–48 hours, then again after 5–7 days of normal handling, looking for sliding, smeared ink, opening seams, and corners catching neighboring cables.
Save the editable sheet with separate icon, text, and cut-line layers. Keep a blank master tag ready for the next device, so a new console receives the same dimensions and lettering treatment instead of a hurried scrap of tape.
Choose printer-compatible matte printable vinyl for the finished family set. Keep plain paper for sizing prototypes, then print the final icons directly onto vinyl: its integrated adhesive backing makes a cleaner, simpler flag than a paper-and-tape assembly.














Join the Conversation
Nothing here yet. Add your opinion.
Add Your Thoughts