
Give Likely Revisions Their Own Layers
A crowded layer stack can eat hours across a client turnaround: hunt for an unnamed highlight, move the pot, discover its shadow stayed behind, repeat. Meanwhile, your tablet’s canvas-specific layer ceiling can stop you adding another layer just when you need room to revise.
Separate artwork by functional depth and likely revisions: background, mid-ground where needed, main subject, linework, and lighting. A fern leaf rarely needs its own permanent slot. A lighting pass that the client may ask you to warm probably does.
I like to make the revision list before picking up the stylus. For a character holding a potted fern, that list is wonderfully concrete: recolor the pot, adjust the pose, change the lighting. Those requests give the stack a job.
Spend a planned 3–5 minutes checking these decisions before painting:
- Revision speed: Can you reach each likely edit without collecting scattered marks?
- Canvas allowance: For an 8 × 10-inch printable at 300 pixels per inch, create a 2400 × 3000-pixel canvas and check its maximum layers on your actual device.
- Delivery requirements: Does the recipient need an editable painting, animation parts, or print-production artwork?
Strategic consolidation gives a global adjustment fewer targets. It also gives the next editor recognizable names instead of a tiny archaeological dig.
One Fern Portrait, Two Very Different Stacks
Here’s a constructed desk comparison you can recreate with the same drawing: a character holding a terracotta pot filled with fern fronds. Duplicate it into two files.
File A has 45 micro-layers, separating leaves, rim details, highlights, and shadows. File B has six functional layers: clean linework, character flats, clipped character shading, plant-and-pot flats, clipped plant-and-pot shading, and background.
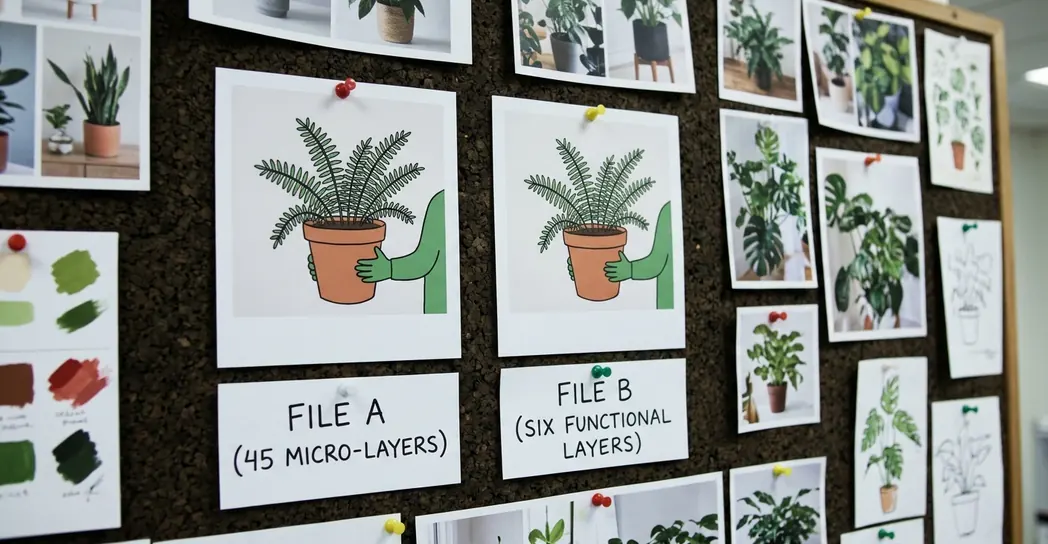
Turn the Terracotta Pot Ceramic Blue
In File B, select the pot’s base-color region on the plant-and-pot flats layer, then adjust its hue. Tweak the clipped shading to warm the illumination on the pot. To warm the whole scene, adjust the character’s lighting too; each clipped pass follows its own painted subject.
File A spreads the pot’s appearance across five relevant layers: base color, body shadow, rim highlight, bounce light, and reflected color. Locate those contributors, adjust them, and check their combined appearance. The blue base changes how the existing lighting reads, so the hue slider starts the revision rather than finishing it.
Move the Forearm and Pot Together
In File B, select the relevant forearm and pot pixels across flats, shading, and linework. Put those pieces into a temporary transform group. Moving the entire character layer would take the torso along for the ride.
File A requires collecting the corresponding detail layers. Deliberately leave the pot’s rim-light layer unselected, then transform the rest. There it is: a bright little crescent floating at the pot’s former coordinates.
That abandoned highlight makes the coordination cost visible. For your own comparison, allow 5–10 minutes per revision in each file and record unfinished steps at the cutoff. Watch what you spend that window doing: painting, selecting, searching, or repairing.
Why Big Canvases and Loose Lighting Punish Clutter
High-resolution coloring pages and wall art put layer decisions under pressure. Procreate calculates its layer allowance from canvas dimensions and device memory. Check the Procreate official layer limits and canvas size documentation, then inspect the allowance for the canvas you actually intend to use.
Memory pressure can bring slowdowns or instability. The layer ceiling creates a more immediate problem: the app refuses another layer while your revision still needs somewhere to go.
The Pot’s Lighting Has Dependencies
Multiply darkens using the colors beneath it. Overlay and Color Dodge also depend on underlying values. Change the pot’s base color and the composite changes, even when you leave every lighting layer untouched.
Scatter those effects across disconnected layers and you create a cascade of checks. Move the base without its shadow and the marks misalign. Merge a folder whose blend modes, masks, or pass-through behavior depend on outside layers and its appearance can shift.
Try a planned 2–4-minute pot audit: locate each contributor, toggle it, inspect its mask and blend mode. Count panel searches and corrections. Repeated naming, scrolling, and color-coding can consume the attention you wanted to spend drawing a better hand.
Keep Moving Joints and Print Paths Separate
Print-production separations serve a different purpose from painted shadows. A printer may need named spot-color separations, foil artwork, and a vector die-cut contour. Follow that delivery specification from the outset. A painted outline does not automatically become a usable cutting path.
Animation changes the file’s job, too. A forearm prepared for Spine or After Effects needs an independently addressable part and painted overlap behind the joint. The fern pot may need its own asset, with hidden artwork covering the agreed movement.
Protect Delivery Parts
Keep known rig parts and required print separations intact from the start; splitting a finished painting cannot recover hidden artwork or editable production data.
“Work merged, split at delivery” suits approved painted surfaces. Paint those surfaces on consolidated layers for freer brush blending. After approval, archive the painting, extract the requested visible pieces, and reconstruct hidden edges before export. Budget that reconstruction as actual drawing work.
Keep editable typography, hand-lettering, and speech bubbles isolated from the raster illustration as well. Translated wording, a font change, or a bubble shift should leave the character untouched.
Set aside an initial 10–15-minute delivery inspection for part names, joint overlaps, editable text, and production paths. Use it to identify remaining work before packaging the files.
Build Five Working Tiers, Then Consolidate at Approval
A lean illustration file can grow from five functional tiers. Treat these as organizational roles, with extra separation wherever a specific revision or delivery requirement earns it.
- Sketch/Reference: Keep the construction drawing available while decisions remain open; discard it at approval.
- Clean Linework: Use Multiply when appropriate. An app’s Reference setting serves a separate purpose, letting fill tools consult linework boundaries.
- Subject Flats: Organize major silhouettes together. Select internal color zones before painting within them.
- Clipped Lighting & Texture: Keep adjustable brushwork clipped to the subject’s painted footprint until lighting and color receive approval.
- Background & Atmosphere: Keep the setting independently adjustable so a backdrop change leaves the character intact.
The useful combination is selection, Alpha Lock, and clipping. A contiguous-color selection isolates the pot body or a cheek. Alpha Lock protects transparent pixels, while the selection protects neighboring opaque colors. A clipping mask contains texture within the underlying silhouette and keeps that pass separately editable.
With a Wacom tablet, that setup lets you brush a cheek or pot pattern directly into its selected color region without creating a permanent layer for every dab.
At approval, reserve 3–5 minutes to compare the consolidated copy with the archive and inspect edges at full resolution. Check that the subject selection includes its linework and lighting while leaving the background alone.
At the drawing desk, you duplicate the finished thirty-pass project into the backup archive. On the active canvas, you consolidate it into four clean layers: linework, subject color, subject lighting, and background. You select the character with every associated mark, then resize the whole fern-carrying crew in one smooth drag of the stylus.




Join the Conversation
Nothing here yet. Add your opinion.
Add Your Thoughts